Wednesday, February 29, 2012

Excuse my French!

This is my card for the  Shabby Tea Room challenge this week.
The challenge is to use neutrals, navy & distressing. 

Here's the inspiration photo.

I incorporated the French sign, Paris letter, blue & white plate, (found at Graphics Fairy)  pitcher, shutters and the blue gingham.  This is not my usual style, so I found it to be a bit of a challenge, but now it's done I find that it's growing on me. 

A couple of close - ups


Thanks for looking, I appreciate you stopping by for a visit.
Have a lovely day.


Saturday, February 25, 2012

Cheeky Monkey

Love this stamp!  I found it on sale at Michael's and just had to have it.
I still have to add a sentiment to this card, probably at the left lower corner, just not sure what to have it say yet.  Don't look too closely at my sewing, I never seem to be able to get a nice neat corner, especially with these kind of stitches.  I really should practice more.

I have entered this card in *The Crazy Challenge*

I appreciate you stopping by today, hope you'll come back soon.


Friday, February 24, 2012

Doily Flower Tutorial

Here's a tutorial to make the white doily flower on this card.
( see my previous post.)


 Step 1)  With punch of your choice, punch along the edge of your paper, mine is 11" long.  
Step 2)   Line up to approx. 1" on your trimmer and cut a strip.
(Make it narrower for a smaller flower or wider if you want a bigger flower)
 Step 3)  On your score board, score every 1/4 inch - being careful not to cut the paper. (as I did in a couple of spots - oops!)
 Step 4)  Now fold accordian style as shown above.
 Step 5)  Join each end together using a glue dot.
Step 6)  Now put a dollop (yes it's a word) of hot glue in the centre....about the size of a quarter.

 Step 7)  Now squish the flower down in the middle and hold for a few seconds until glue is dry. (as you can see, mine came up through the centre, I think it's because my glue wasn't quite as hot as it should be, but that's fine)
 Step 8)  When dry I use my Cricut spatula to loosen from the mat.
 The back
 Step 9)  Now choose a nice bead or button for the centre and you're done!

You could also ink the edges before you score & fold, make a smaller one and add it on the top, use different punches for different effects.
There's lots of different ways of making these flowers, or medallions as they are also called.  My tutorial is based on one that I found on Youtube.

Thanks for visiting today.


Thursday, February 23, 2012

Blue Flower Card

Here's a card using the flower I made a few days ago.
(The tutorial is here)
The white doily flower is also one I made recently.  
Here's my tutorial for the paper bow at the bottom.
The sentiment is from here. 


 The inside, which will have my message on a white circle in the centre of the dark blue.
A closer look.

Thanks for stopping by, hope you have a lovely evening!


Monday, February 20, 2012

Let's Make Some Flowers

Today I felt like making flowers, so here they are.  Easy peasy to make.

Here's a photo tutorial to show you how I did them.

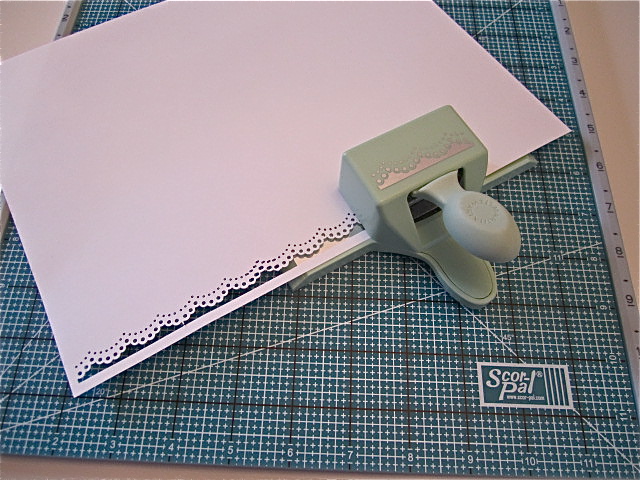
Step 1)  Punch out 2 large circles, 1 medium & 1 small.
Step 2)  Ink the edges of all circles.
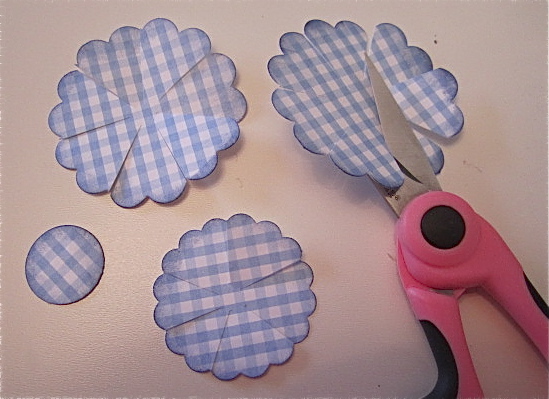
Step 3)  Cut the 2 large circles and 1 med. circle as shown.
     
Step 4)  On a rubber mat or old mousepad emboss each layer with an embossing stylus, or you can use the end of a pencil or pen, whatever you have.  First turn to wrong side and emboss each petal, then turn over and emboss the centre. You'll see that some of the petals lift up.
Step 5)  attach each circle using pop dots of some kind. 
 Step 6)  Add a button to the centre, or some kind of bling.

Now for the leaves
You can use a punch or do the following.....

Take a strip of paper about 3/4" wide, score & fold down the centre. 
Now, keep folded and with your scissors, cut out a half leaf shape.
  Now ink around the edges
Glue to bottom of flower using a glue dot or any kind of glue you like to use.

You can add as many layers as you like, or do a different size flower....just have fun!

Bye for now, thanks for visiting today,


Sunday, February 19, 2012

Hello!


I wanted to use up some papers that I've had for a long time.  I have no idea where I got these because when I first started scrapbooking I took my paper stacks apart.......why?  I don't know.....just seemed like a good idea at the time.

Anyway, back to the card.


I punched out the flower, inked the edges, embossed with my stylus to curl the petals, then layered one on top of the other.....added another punched out flower for the centre and finished off with a gem.  I cut out the leaves, layered them onto a darker green, then pierced holes and drew in stitches, then embossed them as well.

The *frame* on the corners is made using 4 punched out scalloped squares, using  craft knife to slit each one and putting the corners of the background in the slit.  I can't take credit for this idea, I found it online, sorry can't remember where.


The banner is a Hero Arts punch.  I found it at Michaels in the sale bin a couple of days ago.  I coloured it, cut it out, then embossed with my stylus.  The *hello* stamp is one I found in the $1.50 bin at Michaels some time ago.

Thanks for joining me today,

Thursday, February 16, 2012

Shadow Box Card


I made this 50th Anniversary card for some dear friends of ours.
It is a combination card and shadow box.   


From the side it looks like a book.


The inside.
On the left side is a pocket to hold a gift card,


What I used...
Papers: *Anna Griffin* designer pack. DCWV *metallic stack* - gold
Cream card stock for base
Flowers:  Prima
Birdcage:  *Serenade* Cricut cartridge
Ribbon:  Walmart
Edge punch & leaf punch:  Martha Stewart
Small heart  punch:  Fiskars
Die: Spellbinders *Beaded Ovals*
Pearls:  Dollar store
Music & *Love* are digi images. 

If you'd like to try making one, here's a video tutorial.


Now I have another card to show you.
This is one I made for a friend.


Thanks for dropping by and have a really super day!


Related Posts Plugin for WordPress, Blogger...